
This post will take you through some of the process of sunprinting fabric using deeper colors than I usually have used in the past. My original Sunprinting Mini Tutorial shows the main steps to the process, but this post will give some additional information using different paints.

Painting and Sunprinting with Black
Above- fat quarters of fabric dried and ready for removal of items used for printing. This summer, my kitchen is where I have to paint my fabrics before taking them out to the sunny table. Not as handy as the tent I have used out front, but the painting and placing of leaves, etc. needs to be done in the shade so the fabric doesn’t start to dry too soon.

Sunprints 8-31-10
This photo above shows some of the fabrics I have printed using mostly black paint and some with other colors added. In the past I have use mostly textile or other medium bodied acrylic paints thinned with water to do my sunprints with. When those paints are thinned with water, the colors become lighter. This group of fabrics were printed using Dye-Na-Flo paints by Jacquard. These paints are very thin and act much like dye on the fabric. They have a much higher pigment content which will result in deeper colors with very little paint “feel” after drying. In the past I had added extra pigments to my thinned paints to get deeper colors. This type of paint makes things much easier, saving steps.

Batiks for Printing
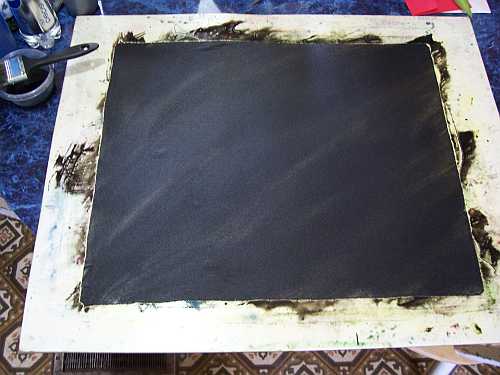
The first step in the sunprinting process is wetting the fabric and smoothing it onto vinyl covered boards. Above, I decided to see what would happen if I sunprinted on bright batik fabrics instead of white fabric. I first painted the wet fabric pieces with the black Dye-Na-Flo right out of the bottle.
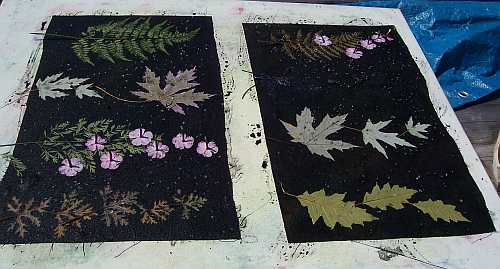
Batiks with Leaves
The above photo shows the painted batiks with leaves and flowers placed on the wet paint, sprinkled with coarse sea salt, and placed in the sun outdoors. My original tutorial was done during the winter, but the easiest time of year to sunprint is during warm, low humidity days of summer and early fall. I have a table outdoors in the sun that I place the paint boards of fabric on to dry. If the weather cooperates, the fabric will dry in less than half an hour and result in fairly sharp prints. Higher humidity, breezes, lower temperatures, or clouds can affect your results. That’s part of the fun of sunprinting, or fabric painting in general…. you never know how things will turn out until the paint is dry.
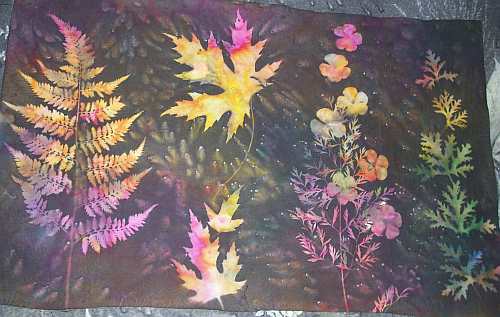
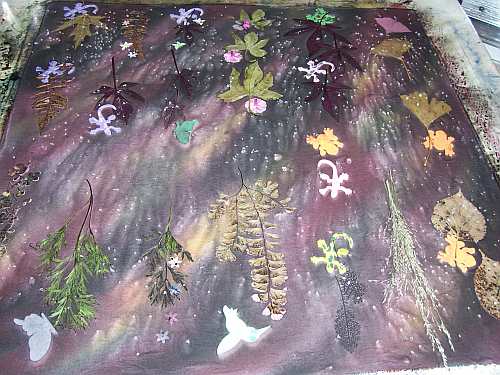
Sunprints Black over Batik 1
This is what the right piece from the first photo ended up looking like after the drying process. The colors ended up muted a bit from the black paint, but they show up pretty well where the leaves were. My husband wondered why I was “ruining” perfectly good fabric by painting it black…. This is what I wanted to see… if the batiks would allow prints to form as well as the white muslin that I usually use. It worked pretty nicely, and I like the results.
Black Paint on Fabric
Here is a piece of white fabric painted with the black paint, ready for the leaves to be added. Pressed leaves, foamie sheet cutouts, flowers, confetti, and more can be used to produce prints. Anything that will lay flat on the painted surface will cause a sunprint to form. The prints are formed during the drying process, the paint exposed to the sun dries first, then the moisture is pulled out from under the items placed on top, which pulls the paint along with it, causing the color to be partially or totally removed depending on conditions.
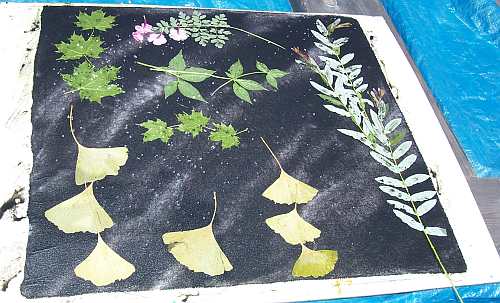
Ginkgos on Fabric 1
This was the first time I was able to use Ginkgo leaves for prints. I have always loved the look of them, but had not been able to collect any until last summer. I was lucky to find a little collection of the leaves and stored them between layers of newspaper as I do with all of the leaves I use multiple times. I did run across a problem that I have also had when using my other favorite leaves, the Maples. The leaves tend to curl up while the wet fabric dries underneath them. They are both leathery leaves, but tend to want to “do their own thing” when they are in the sun. I finally found the fix…. I soaked the pressed leaves for a day or so in a solution of glycerin and water. Here is a post showing the process of preserving the leaves with glycerin. The glycerin helps the leaves to remain soft and pliable even after a few times in the sun while the fabric dries. Now I am able to keep using the few leaves I have numerous times.
Fabric with Leaves, Etc
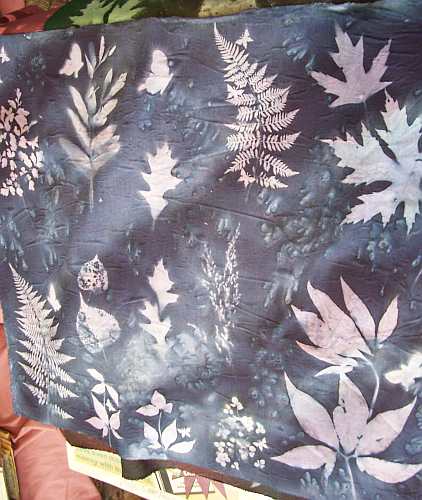
Here is a dry piece of fabric ready for the leaves and other objects to be removed to reveal the resulting prints. You can see that one Ginkgo leaf has been removed in the upper right corner. If untreated leaves have been used, I need to spray them lightly with water and let them soften a bit before peeling them off. Ferns, Queen Ann’s Lace and others can get really brittle in the sun. I carefully remove the leaves, foamies, etc. before brushing the salt off the surface. the salt is placed in a small plastic container and can be reused on more fabric.

Black and Blue Sunprint 2
Here is a piece after the leaves and more have been removed. Some prints are brighter than others, and you can see where the large fern above lifted off the surface of the fabric a bit, causing more of a ghost image than a sharp print. Now the fabric is ready to be heat set by ironing, then it will be ready for cutting up to use in various projects.
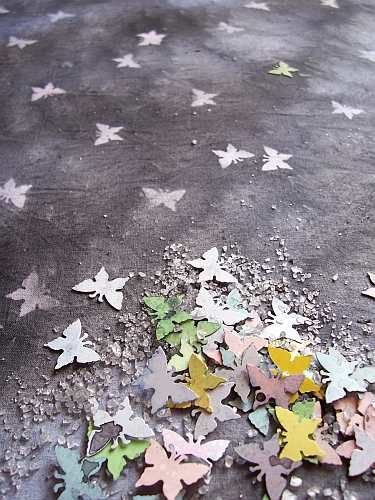
Salt and Butterflies
I not only do fabrics with leaves and flowers, but try to be sure I have some fabrics that will be good accent fabrics for the larger prints. The photo above here shows one of the pieces I sprinkled butterfly confetti and then salt over before drying. The butterflies and salt were brushed off when dry, and the butterflies separated from the salt so they can be used again and again. I added water to the paint to get more of a gray. The more water that is added to the paint, the lighter the color will be, and I need lights and mediums as well as the darks. I also did some pieces of fabric with no sunprints, just salt or scrunched for different textures. To see more of the fabrics I printed during this session, and what I did with some…. check out this post on my Main Blog- Back to Sunprinting and New Book Covers

Set of Black Book Covers
Fabric from this week’s painting sessions will be used in various art quilts, book covers, and other items. Here, above, are a few notebook, journal, or memo pad covers that I made with some of the prints. These are available for purchase in my Andrus Gardens Gift Items Studio on Artfire. The full size Composition Books are available here, while the Mini Composition Book with Lizard is available here.

Black and Gold Blooms
Here is one of the Mini Art Quilts that I made using a sunprint grouping from one of the fabrics. This has been dressed up with metallic thread quilting, a gold bow, shimmery fabric on the left, and metallic letters. “Black and Gold Blooms” is 12.5″ high by 8.5″ wide, and is available for purchase in my Andrus Gardens Quilts Studio on Artfire. When I lay out my leaves and whatever, I sometimes try to create arrangements that I can be the focus of my quilts or gift items. Other times, I just lay things randomly without too much thought…. either way, the fabric can always be used.
I am a former textile artist and new pattern designer with a degree in horticulture, wishing to share my love of nature, flowers and gardens with everyone through my photos, sunprinted fabrics, and now pattern designs. Chronic Lyme Disease has caused major changes to the direction my life. I have to limit the amount of time spent digging in my gardens, and quilting has become more difficult. I discovered pattern design as a way to get art back into my life. I now use my gardens and photos to inspire designs that can be used on fabrics and print on demand items.


Hi Sue, thanks for a great tutorial on sun printing. I wouldn’t have thought of using black paint, but I can see that it is a great way to use up some of those bright multi colour batiks I’ve had as part of fat quarter packs and never wanted to use in anything.
Very cool experiment with the black paint over colors, Sue. Thanks for sharing it. Your results are lovely.
The blacks/greys turned out great and look wonderfully set against the brighter colors.
Great idea about using the batiks – don’t know why I never thought of it! Now I know what to do with those over-bright fabrics I bought a few years ago.
Great experiments. The black paint over batik is a fabulous idea. Love the results.
Great information…thank you for sharing it. I want to try some sun printing myself and was impressed with the effects you got on the batiks. I like your results better than the original batik.
This is a very interesting tutorial Sue. Really enjoyed it and especially was interested in preserving leaves with the glycerin. This can be a great technique for use with my hand dyes – see my website dyesmithy.com. Thanks so much.
Fabulous sunprints. Love the idea of using the colourful batiks for the base fabric and love the great contrast against the black paint. I will try it this weekend if we get some sun. Thanks for posting all this great info.