
There has been a lot of retreating going on around here lately, such as my running away and hiding in bed or vegging on the couch (not a good kind), but a much better kind of retreating is with a bunch of quilty friends on a quilting retreat. A week ago, I was at Watson Homestead near Painted Post NY with 27 or so other women from the Endless Mountains Quilt Guild. The retreat started the previous Wednesday and ended Sunday…. 5 days of no housework, cooking, or other household distractions…. just quilting, sewing, creating and of course some chatting… I spent many days packing things and loading the van in advance, hoping that doing a little each day would keep a nasty pain flare at bay (it Was a good idea…). I also finished washing out the latest batch of dyed fabrics and started ironing all of them….the night before leaving (OK, Not such a good idea)….
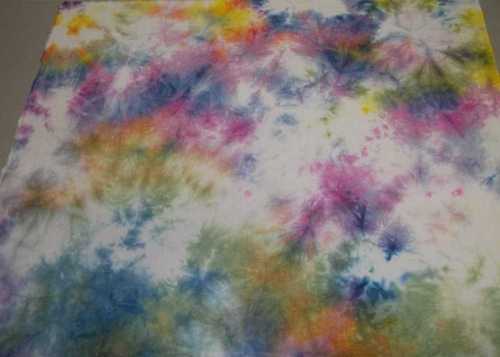
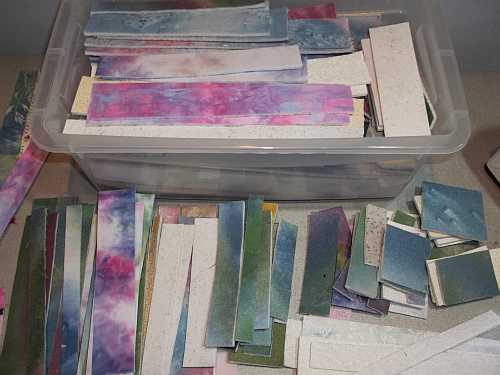
Tricolor Dyed fabric- Another piece that was under other other pieces in the dye container, giving it bright colors, but more white space.
One doesn’t realize how long it takes or how mesmerizing ironing all that fabric can be…. it was like Christmas again…. You just don’t see all the details of the patterns and colors until things are pressed out nicely…. Once I got started I couldn’t stop till all was done… I didn’t want to waste retreat time with the ironing board… OK, it was well after midnight when I finished that task….
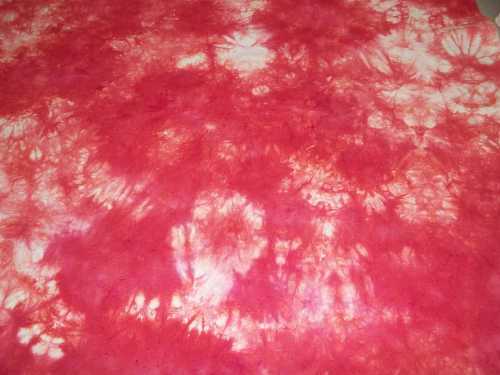
Coral Fabric- A try at a color to go with some peachy-coral and hot pink painted ones from summer…. Look at the subtle color differences and neat patterns!
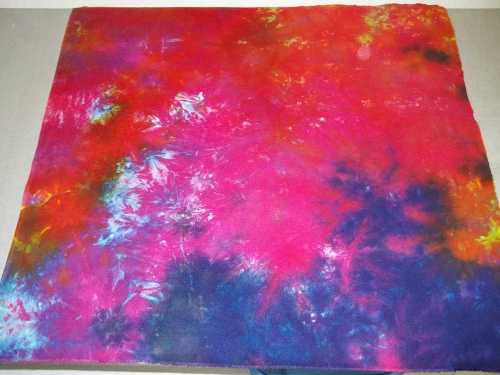
Sateen Surprise #1- I loved how the colors were so bright on this piece, but didn’t realize it was a sateen till I ironed it…. I love surprises like that! The cotton sateen really takes the dye well, giving super rich, bright colors.
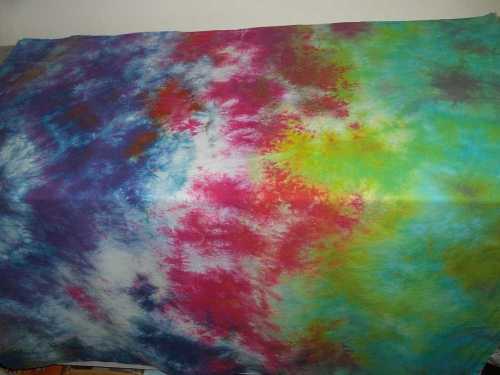
Multi Colors on White… This piece looked perfect for my stained glass.
There were LOTS more great pieces, but I won’t bore you with them here 😉 I thought I might concentrate on doing more with stained glass looking borders on pieces, and the fabric above is one that is perfect for what I wanted to do. I never know just what I will want to do during a retreat, so I usually take tons of fabric and whatever supplies and goodies I can think of that I might “need”…. Always too much….
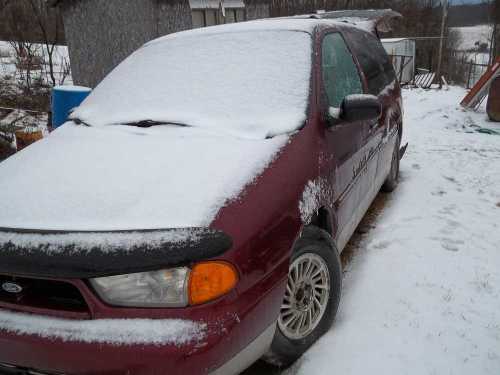
Van in Slush- Not what you want to see when you are planning an escape…
Ahhhh…. the travel morning…. Yea, a slushy snow, sleet, rain storm was upon us… Ikkkk! Thankfully it was warm enough that the ice on the van slid off easily and the roads were pretty bare and mostly just wet until I got near the retreat center. Lugging my things in with golf ball sized splatting snowballs falling wasn’t too fun, but once all was moved in, I would be able to stay inside for the rest of the time there.
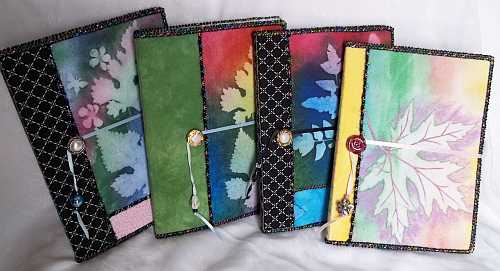
Group of Brag Book Photo Albums
Once I got my things set up and organized, I began by finishing up several of the photo album and journal covers I had started months ago using some of my newest sunprints. By the middle of day 2 I had the four albums above and 3 larger journal covers done. A good start considering I was dealing with one of the worst pain flares I have had in a long time… It wasn’t a surprise…. remember the ironing??… and lugging stuff always sets off flares…. I did a lot of stretching, pacing, and a bit of napping and got through the worst. The Album on the right in the above photo gave me a bit of a challenge… I could not find a button in my stash that looked right, so I began some playing with new supplies that arrived 2 days before I left for the retreat. (a future post will show what I got…. it was a prize that I won!)
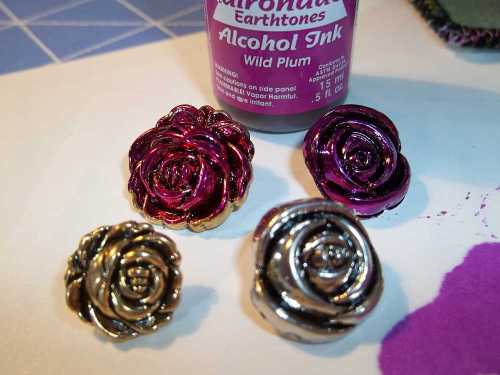
Playing with Alcohol inks on Buttons- This shows how the same ink looks on gold and silver tone buttons.
I had 6 new bottles of Adirondack Alcohol Inks to try out and decided to add some color to some of my buttons. I had never played with the stuff, so I didn’t have any applicators or extra alcohol to clean things up (or gloves)… I ended up with some great buttons And a hot pink finger… (since getting home I have learned a lot from online videos about using the inks… lots of play ahead!)

Inked Buttons- with Vintaj sealer on them
I learned a lot with the first buttons, and finally discovered that poking the shanks into a piece of card stock made things much easier… Next time there will be parchment over the card stock… I almost sealed the paper onto the buttons and almost ended up with an extra decoration permanently on the handle of my spare rotary cutter handle. I only happened to have the Vintaj sealer by luck…. another part of the prize… The bottom left button was white pearl with gold around it. The silver rose with Wild Plum ink was used on the Maple leaf album.

Mini Design Wall with “subjects” for the week.
After finishing some book covers, I started with my stained glass…. I have been trying to think of ways of updating some of my older little quilts that I have left from years of selling at art and craft shows. I got the idea after I decided that some new pieces needed a bit more pizazz and started adding the stained glass look borders to them. The Delphinium piece above is one of my newest, and the Rose is circa 2003 from my “Botanical Applique” series of simple quilts for framing. Since my stash of “chunks and hunks” (little fused quilt sandwiches in various sizes) was very unorganized, I started by sorting things to see what colors I needed to add to what I had on hand. I spent one whole evening sorting and organizing things. I even threw out some of the tiniest pieces I had been saving (horrors!)… they did go to a good cause… someone was collecting little bits and scraps to use as filling for dog beds for a shelter.
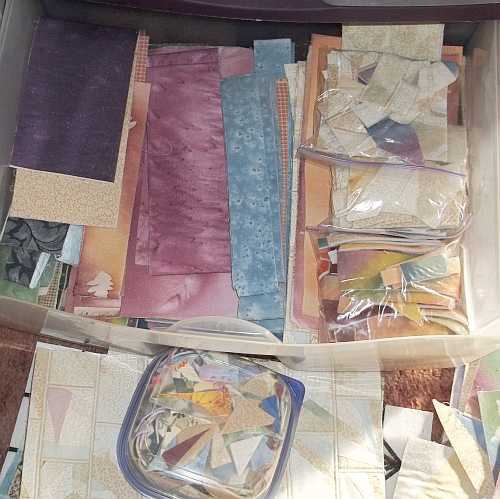
Mostly Large Hunks and Strips- This is a large plastic drawer full of sorted pieces… There is also a small container of itty bitty bits for pins… I couldn’t part with all the little stuff 😉 Under the container are pieces of an art quilt started years ago…
Small Strips and Chunks- Sorted by color family and size
The above strips and chunks were laid out on a tray table and a larger table at the retreat while I was working with them so I could see what I had to use… It was Wonderful having so much room to work! Now at home they are neatly in a plastic container till I use them again.
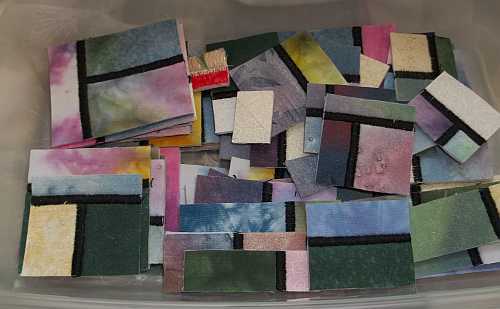
Small Stained Glass Pieces- in the process of becoming borders.
To make my stained glass, I satin stitch seam my little fused sandwiches using black thread. I start by randomly stitching different colored pieces together and keep adding, cutting and adding more until I get something I like. At the end of the retreat I had this little container with lots of pieces.
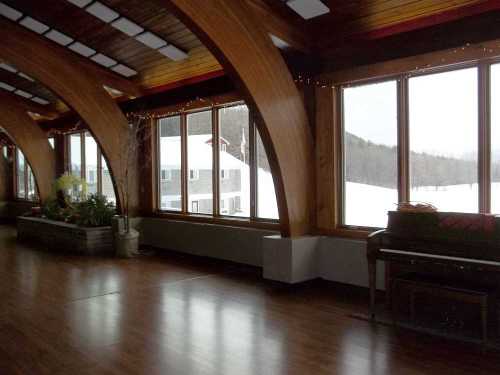
Watson Dining Room Windows- This was a HUGE Room! This photo doesn’t begin to show the size at all.
Off on a detour now…. Here are photos from inside the retreat center where we were… As you can see out the windows, the ground was covered with snow… It snowed at least a bit every day we were there except moving out day… Perfect weather to be able to stay indoors.
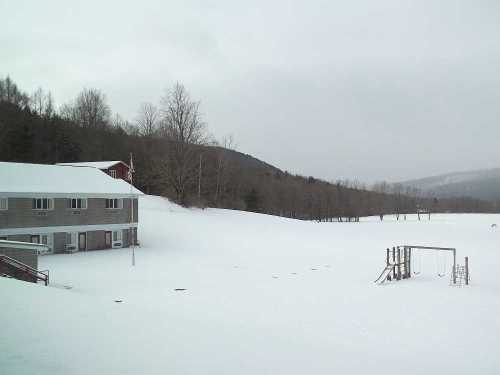
Watson View 1 Out The Windows- showing the “hotel room wing” and the view.
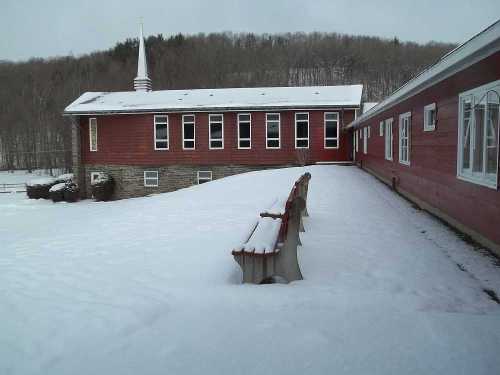
Watson View of Chapel- We were working in the room below the chapel.
Even though we were indoors, there was lots of walking involved… We had use of a huge room under the chapel shown above, and stayed in dorm rooms along the halls between the chapel and dining room, or in hotel rooms way on the other side of the rambling building. We also had an extra room downstairs near the main room where we had our scrap pile for sharing and other items to share along with a couple extra irons… Too many irons in the main room results in tripped breakers. I left a LOT of fabric pieces and leftover strips on the share tables that went home with new owners 🙂
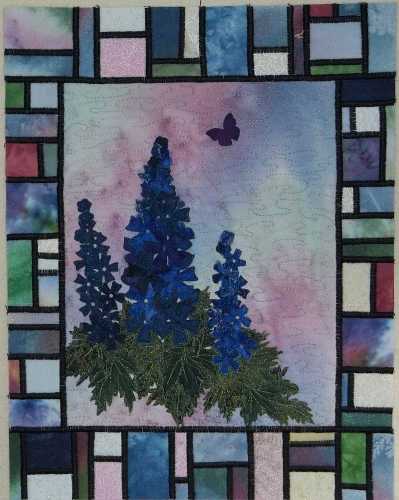
Delphiniums in the Garden With Stained Glass Border Stitched On
This was the first quilt I worked on… I thought it was finished months ago, but then I realized it needed something, so it got a stained glass border. While making the border for this one, I also started one for the Yellow Rose piece in the earlier photo.
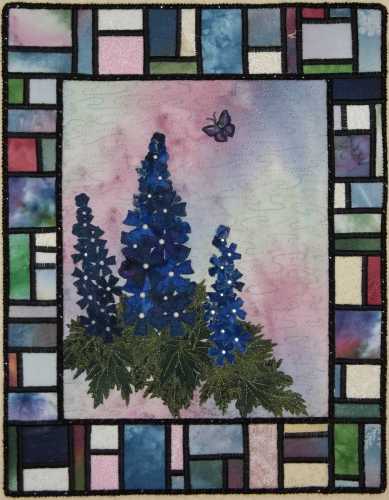
Delphiniums in the Garden Finished- 11″x14″- Black with silver yarn couched around the center panel and used to bind the piece.
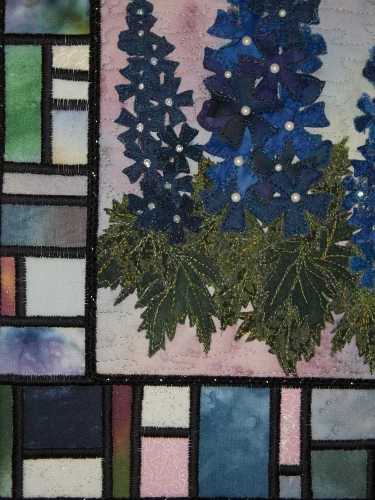
Delphiniums in the Garden Finished Detail 1- Shows pearls, crystals and pearly painted flower centers.
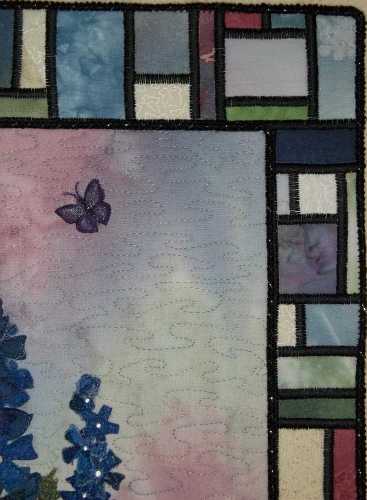
Delphiniums in the Garden Finished Detail 2- Showing Butterfly
The only quilt finished during the retreat…. “Delphiniums in the Garden” also ended up going home with a new owner!! Another guild member saw it when I took it for show and tell, wondering if it should get the stained glass…

Yellow Rose Nearly Bordered- Ready to be stitched to the Rose panel after I remove the white border. This will finish about 11″x14″.
My Yellow Rose got pretty close to done…. the border is ready to be stitched on and finishing touches added.
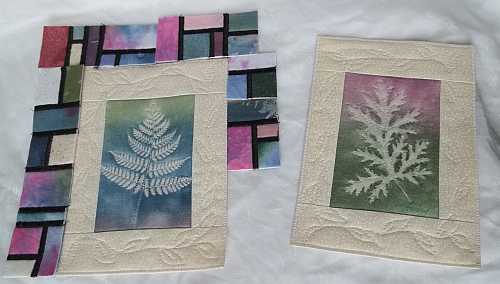
More Mini Quilts Awaiting Borders
The two little quilts above are a couple that are 5″x10″ in size with their ivory borders and I think those borders will stay and the stained glass will be added to make them 8×10″ when finished. The stained glass piecing is pretty meditative and works well as something to so when my brain isn’t working well… I love seeing how the colors interact with each other as I add them with the black stitching. If this helps to make some of my oldies but goodies more marketable, then that is definitely a win, win, win!
Now that I have been home a while and nearly recovered from the “back home flare”, my next project will be to play with my new supplies that came before the retreat….between bouts of stitching stained glass.
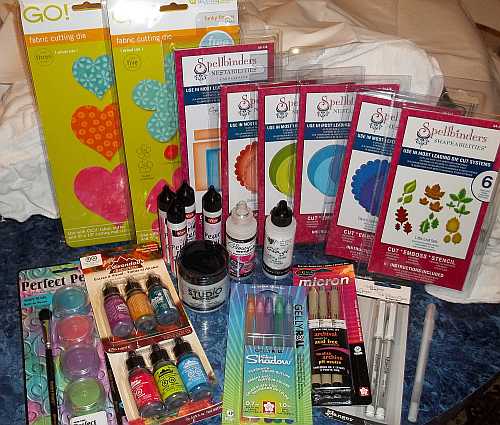
Prize won in the Get Crafty Promotion put out by ArtFire! I still can’t believe I won all this!
Amazingly, I won a big prize from ArtFire from a promotion for their new Craft Supplies section…. WOW!! I will be blogging about what I do with what I received… Such a wonderful thing to have happen especially when otherwise I would not be able to purchase any of those items for quite some time. Art Therapy, here I come!
This post is linked to Nina Marie’s Off the Wall Friday… Follow the link to check out lots of great posts from other bloggers.
I am a former textile artist and new pattern designer with a degree in horticulture, wishing to share my love of nature, flowers and gardens with everyone through my photos, sunprinted fabrics, and now pattern designs. Chronic Lyme Disease has caused major changes to the direction my life. I have to limit the amount of time spent digging in my gardens, and quilting has become more difficult. I discovered pattern design as a way to get art back into my life. I now use my gardens and photos to inspire designs that can be used on fabrics and print on demand items.


WOW that is a sweet prize! Congratulations!!!
I love your brag books. They area really pretty. I haven’t tried alcohol inks but it fun to see what they can do. ONe more thing to add to the stash!!!
Congrats on the win. Have fun with all your new toys. I love your brag books! Great job!
Thanks!
Thanks! So far the inks have been fun… I can’t wait to do more playing with them.
I am very impressed. I love the stained glass border design with the botanical motifs. You have created the look so perfectly. My husband is a stained glass artist- so your motifs really are close to my heart. Looks beautiful!
Hi, Sue. Fun post–I am so envious that you get to go to retreats like the one you described! Your stained glass technique is very lovely–very luminous.
best,
nadia